You are here
More Exercises for Healthy Shoulders - Part Three
 In this third installment of exercises for healthy shoulders, I'll take you through a few simple stretches and one foam rolling exercise that can help keep all of the major tendons and ligaments that surround your shoulder joints functional and well perfused with healthy blood flow. These exercises are excellent for preventing and addressing common shoulder problems like impingement and adhesive capsulitis (frozen shoulder).
Please remember that your shoulder joints are ball-in-socket joints, designed to be as flexible as possible to allow for a wide range of movement. There are plenty of ligaments in place to help prevent your shoulders from dislocating, but these ligaments have built-in laxity to allow for overhead activities. No other major joint in your body has as much innate flexibility as your shoulder joints.
The downside of having considerable room for joint play is that it can be easy and even natural to allow your shoulders to hunch down and forward, especially while seated at a desk or on a couch. If you're like most people, you do this because when you're seated, it takes less energy to "turtle" your shoulders and upper back than it does to keep these areas upright.
Slouching forward decreases the amount of space that's available within your shoulders for a number of tendons, blood vessels, and nerves that course through.
So in stretching and exercising your shoulders, a primary goal should be to "open up" your shoulders and chest to allow for plenty of breathing room for the many structures in this area.
Stretches to Prevent or Address Shoulder Impingement and Frozen Shoulder
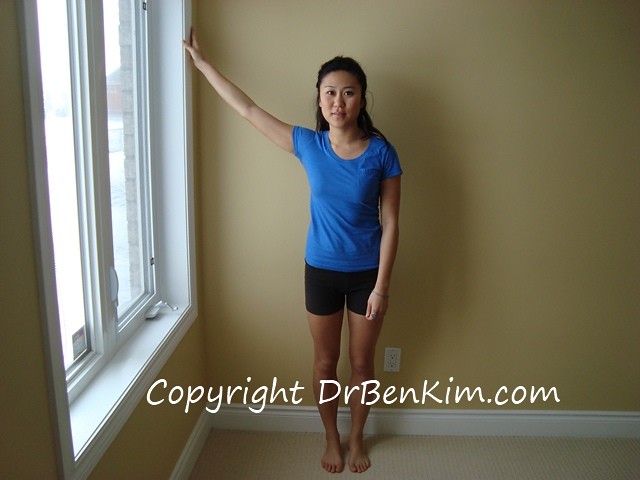
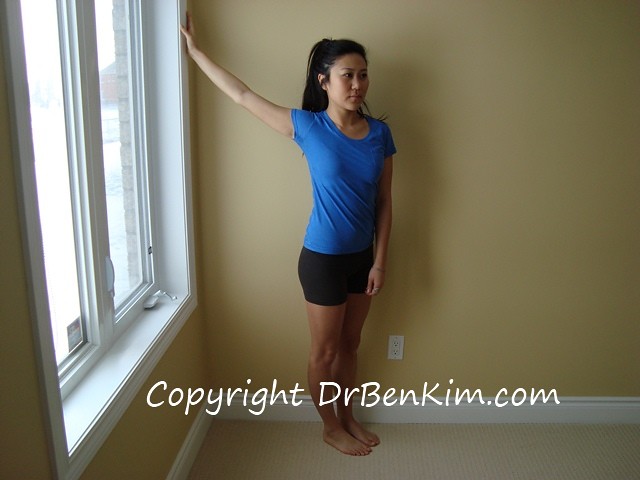
Begin by finding a sturdy surface to stretch your arm and chest against, like a window or door frame, and rest the hand of your outstretched arm against the frame, with your arm elevated about 30 to 60 degrees above the plane of the floor.
If you can't elevate your arm this high, just go as high as you comfortably can, even if you have to stay at shoulder level or below.
Take a firm hold of the window frame so that your arm doesn't move, then rotate the rest of your body to turn about 30 degrees away from the window. The idea is to create a stretch in your pectoral (chest) muscle fibers and to encourage the ball of your shoulder joint to stretch superiorly and posteriorly within its ligamentous capsule, which is the extreme opposite position that it sinks into when you slouch forward.
If you don't feel a comfortable stretch throughout your chest muscles and shoulder, rotate your body until you do. Rotate your trunk and legs together, as rotating just one of these areas will put unnecessary strain on your spine.
Once you feel a comfortable stretch, hold this position for a good 30 seconds or however long is comfortable, being mindful of maintaining steady breathing. Repeat this stretch two or three times, and be sure to do the other side of your body.
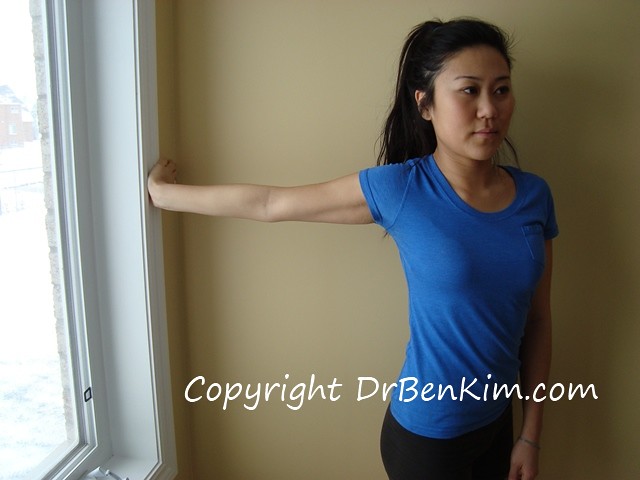
Next, you want to do a similar stretch, but target your biceps muscle and tendon. Your biceps tendon originates from a bony protuberance of your scapula (shoulder blade) just under your clavicle (collar bone). It runs right through your shoulder capsule, and can experience unnecessary wear and tear when you slouch forward.
Hold onto a window or door frame just as you did with the pectoral stretch above, but this time, keep your arm parallel with the floor, and most importantly, don't angle your hand up or downward - keep your palm and fingers running parallel with the rest of your arm and the floor. Your wrist will be extended (bent backward), but in order to target your biceps muscle and tendon, your hand should remain parallel with the rest of your arm.
As with the pectoral stretch, maintain your arm and hand in this position, then rotate your trunk and legs the other way until you feel a comfortable stretch in your biceps. Even if you feel this mainly or entirely within the muscle belly of your biceps rather than within your shoulder joint where your biceps tendon is, not to worry, as stretching the muscle belly ensures some degree of stretching of your biceps tendon and the surrounding structures.
Again, hold for about 30 seconds or as long as is comfortable, maintain steady breathing, and repeat for two or three sets. Repeat on the other side.
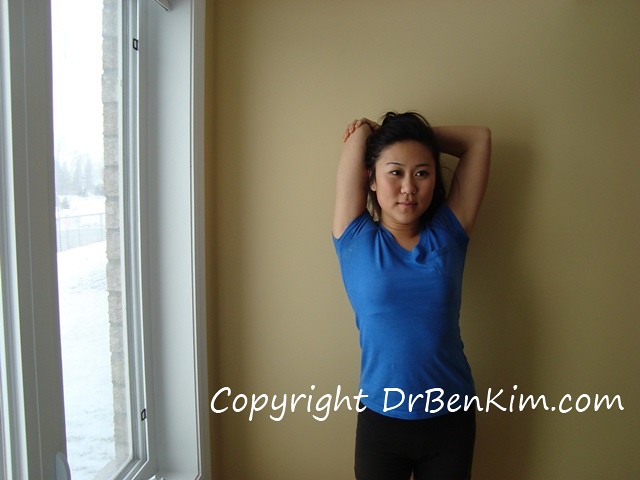
Next, you want to stretch out your triceps, the three-bellied muscle that lies on the opposite side of your arm. Your triceps also originates in part from a portion of your scapula.
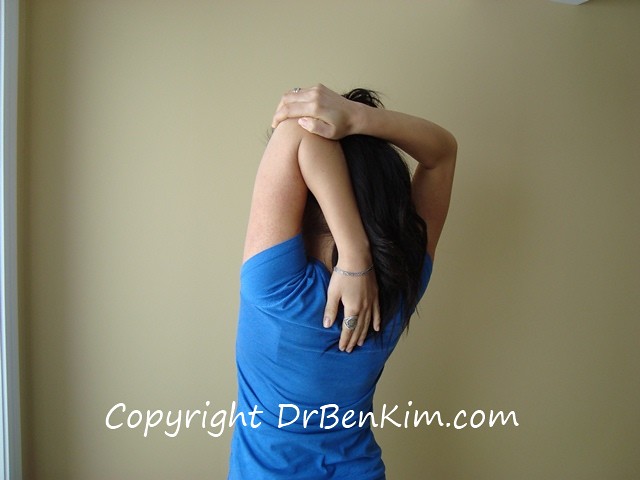
To stretch your triceps muscle and tendon, raise and fold your target arm up and slightly behind your head, like you're going to scratch your upper back, then use your opposite hand to pull on your bent elbow.
If you don't feel enough of a stretch in this position, try laterally bending your body to the opposite side of your target arm.
Hold, breathe, repeat, and do the other side.
Now to physically massage and strip most of these and other structures that run through your shoulder, bring out your foam roller, or if you don't have one, a firm ball like basketball or medicine ball. In a pinch, a rolling pin can also work, but you'll need to be pretty flexible to get low enough to the ground to make a rolling pin work in this case.
Lie on your side with your axilla (armpit) directly over your roller.
Rock your body back and forth to roll the structures in your axilla. Just a few inches back and forth will cover most of the target structures (triceps, latissimus dorsi, rotator cuff tendons, serratus muscle fibers, and superficial nerve fibers). Use as much pressure as is comfortable - you can regulate the amount of pressure that you use by putting less or more weight on your opposite hand and hips.
Before I explain two other movements you can do on your roller in this position, please have a look at this brief video clip that shows all of these rolling movements in action:
From this clip, you can see that after rocking back and forth, the next movement is to rotate your arm/shoulder back and forth like you're winning and losing an arm wrestle. This applies a transverse massage to the structures in your axilla. You can gently roll your body up and down on the roller as you're rotating your arm to get more overall coverage.
And the last movement is to roll your trunk forward and back in the same directions that you moved your arm in with the arm wrestle movements.
As you do these rolling exercises, you'll likely run into areas that are tender and/or taut; feel free to linger in these areas, and to modify any of the movements described and shown here as your body dictates you to. Through a little trial and error, you will likely find the best patterns to go through that suit your unique structure and needs.
So you have your pectoral stretch, your biceps stretch, your triceps stretch, and finally, the rolling exercises on your axilla.
Please also take some time to review the shoulder stretches and exercises in the first two installments:
Simple Exercises to Keep Your Shoulders Healthy - Part One
Exercises to Keep Your Shoulders and Shoulder Blades Healthy - Part Two
If you have family members or friends who have chronic shoulder and/or upper back discomfort, please consider sharing these exercises with them. They're free to do at any time and just about anywhere, and can be immensely beneficial.
If you don't have a foam roller and are looking to invest in one that offers a blend of comfort, durability, and ideal density to provide therapeutic rolling of your muscles and ligaments, please feel free to have a look at the one that I had custom made for our clients here:
For a DVD that presents still photos and video clips that illustrate how to take your body through all of the major stretches and foam rolling exercises you can do to keep your body as healthy as your genetics will allow, have a look here:
Stretching and Foam Rolling DVD, by Sharon Lee and Dr. Ben Kim
Join more than 80,000 readers worldwide who receive Dr. Ben Kim's free newsletter
Receive simple suggestions to measurably improve your health and mobility, plus alerts on specials and giveaways at our catalogue
Please Rate This
Highest Rated | Related Posts | ||




Comments
Shoulder exercises
Dr. Kim, I read and actually study your articles faithfully. They are so very helpful, the explanations as well as the pictures, etc.. I am a retired massage therapist, and while I often help out my friends with their various complaints, I often am in need of some help myself. You are really doing a great service. A wise man once said - "You make a living by what you get - but you make a life by what you give" and you are certainly doing that. Thank you! Sincerely - Judy O
Shoulder excercises for pain in scapular region
I am well informed and guided by your article. Thank You.